There is a way to reschedule multiple wp-cron.php jobs so that you can instantly reduce hosting costs and boost website performance. Follow this guide to find out how in 4 easy steps.
hide
Why Reschedule WP-Cron Jobs?
To know why you want to do this, it’s important to first understand what WP-Cron is. WP-Cron is basically the file wp-cron.php in the WordPress codebase. Its purpose is to schedule various tasks that need to run in the background as your website serves visitors. Whenever a visitor accesses your site, wp-cron.php looks at the scheduled jobs and runs the next one in the queue.
Cron jobs come in all types. Some are there to help WordPress core code operate. But a great many are introduced into your site by plugins and themes. They’re “worker bees” that clean up databases, clear caches, send emails, notify users of events, and dozens of other things. The more plugins you install, the more cron jobs are scheduled.
Over time, the quantity of cron jobs and the frequency at which each one runs can multiply together in a way that affects the performance of the application server (PHP) that your WordPress site runs on. It can also affect how much data and how many requests your hosting package is using. If you have so many cron jobs that your hosting package limits are reached, you’ll hear from the hosting company about having to upgrade (pay more) for a bigger plan to handle it all.
If you reach that point, and you’ve tried everything else but the hosting company is still contacting you, perhaps it’s time to reschedule wp-cron jobs.
1. Assess Your Cron Jobs
Open up the WordPress Dashboard and go to the Plugins view. Click “Add New” and search for “Cron Logger”. Install and then activate the plugin.
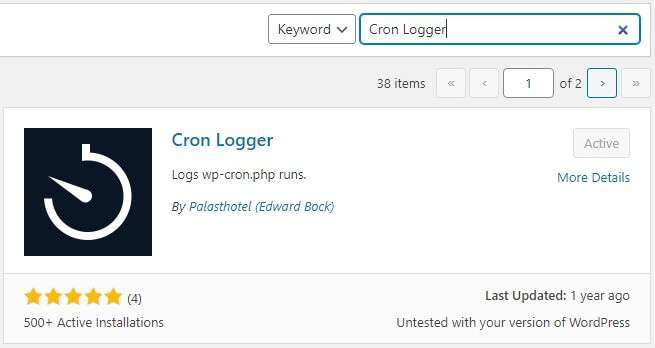
This is only a temporary plugin. You can uninstall it when you’re done with all the steps. It will help you see (and appreciate) just how actively WordPress runs scheduled cron jobs. And at the end you’ll use it to see how your “reschedule wp-cron” project turned out.
To access the logs, go to Tools > Cron Logs. Here’s what the Cron Logger plugin’s output looks like for an example site:
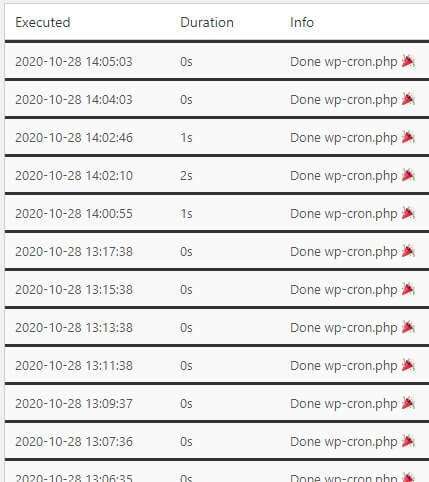
See how these are executed in close to one-minute intervals? That may not seem like too much when seen in this toggled view. But when we click on an executed job to expand it and see everything that was executed, it turns out to be quite a bit, especially every minute of every day over the life of the site.
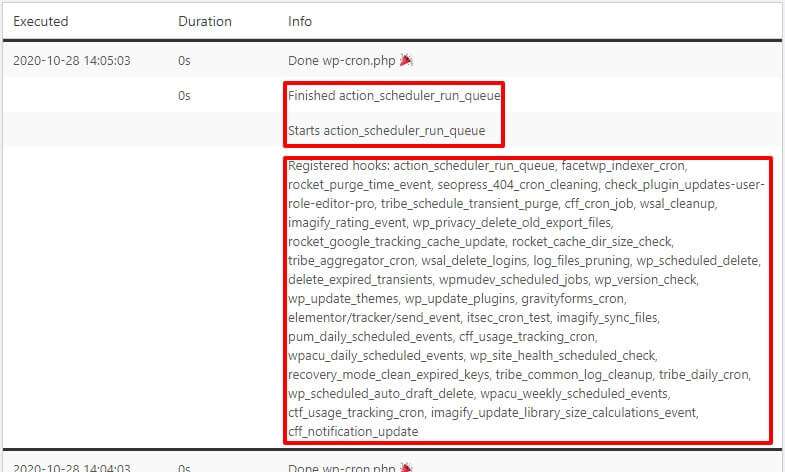
As we’ll later see, each “batch” of these registered hooks that runs every minute takes between 6-8 seconds to fully execute. Even though most of that happens in the background such that the site visitor isn’t affected, it’s not an entirely consequence-less transaction. The hooks still take up computing resources over time that could be better put to use serving users. They still send, receive and request in ways that drive up hosting costs.
Now, go back to the Plugins > Add New page and search for and install “Advanced Cron Manager”. This can also be temporary as we only need it to see the overall scheduling “mess” that is going on at the moment.
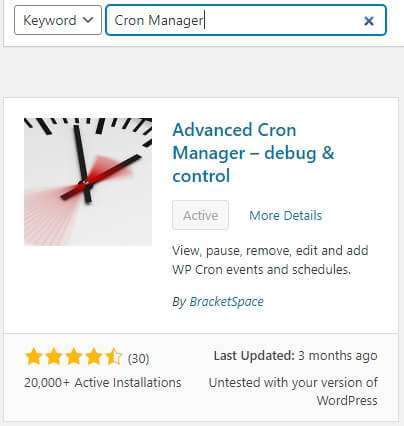
Under Tools > Cron Manager we see how each individual “hook” is scheduled. Some run once hourly, others run once daily, and yet others run weekly. One of these looks familiar from our Cron Logger output above. It’s the “action_scheduler_run_queue” event.
On low-traffic sites, this may not be a problem because it tends to run only when a visitor accesses a page on the site. If you only get a few visitors in a day, it only runs once a minute while they’re accessing the site. But if you have a rate of visitors that is significantly higher, or (lucky you) approaches one every minute, it will tend to run every minute of every day, 24 hours per day, 7 days per week, 365 days of the year. That’s 525,600 times per year!
And remember that this particular event is a sort of “master” event that triggers several others that are queued up and awaiting execution with their longer intervals. Here’s an example view of all items scheduled to run and their intervals.
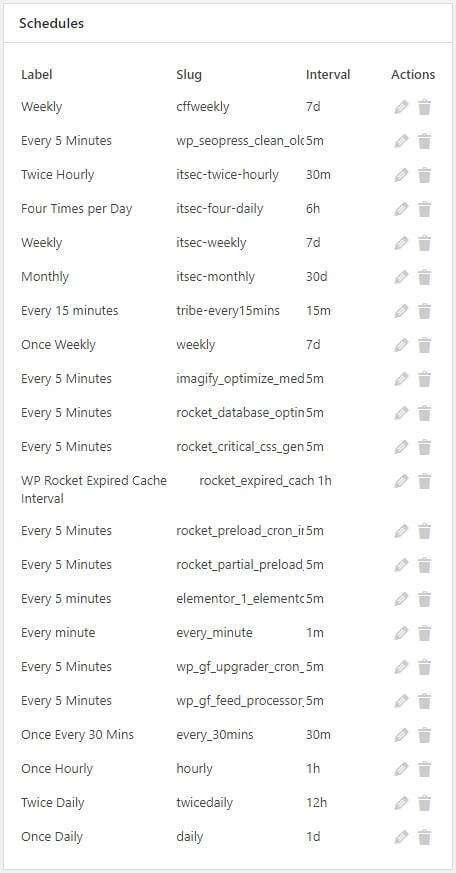
Every site will have different events or “hooks”. You should review this list and figure out a happy medium for the run interval. Because we’re about to set things up so they’ll all run at a more leisurely pace.
You’ll notice that there are options to edit the schedules in this plugin. It’s often hit or miss whether the edit option will be available (not disabled) and whether the changes you make will “stick”. With plugin and core updates, any carefully-arranged reschedule wp-cron operation can be blown away.
In the case of this site, for whatever reason, any reschedule wp-cron change I made to it simply wouldn’t take. It always went back to once per minute no matter what I tried.
2. Set Up Cron-Job.org to Reschedule WP-Cron
Luckily, we can easily and instantly reschedule wp-cron to run once every 15 minutes, 30 minutes, or whatever else suits our needs. Head over to cron-job.org and set up your own free account there. Then, set it up something like what you see in the screenshot example below.
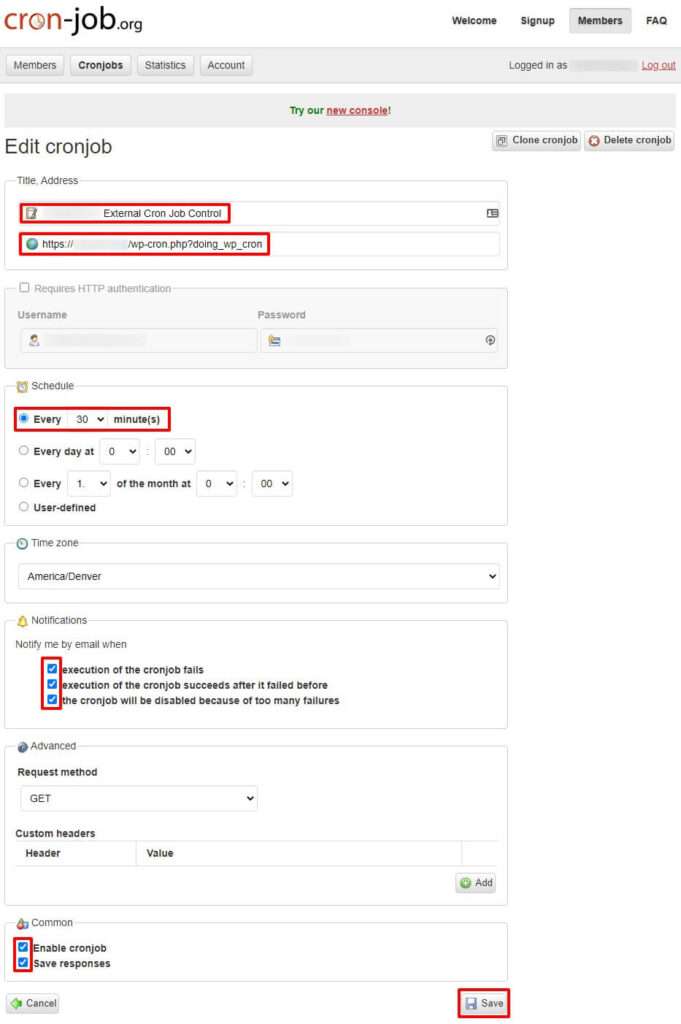
In this example we’re giving the job a name and pointing to the URL endpoint that WordPress provides for externally triggering all queued cron jobs. The URL will be of the form https://example.com/wp-cron?doing_wp_cron. Just fill in your own domain replacing “example.com”.
Then, we set it to run every 30 minutes, setting the notification via email whenever the cronjob fails, when it succeeds after failure, and when it is automatically disabled after too many failures. This helps you to know if something went wrong, if it resolved on its own on the next try, and (if not), that it was disabled so you can investigate.
The “Common” options just give you the ability to enable or disable a particular cronjob and to save the responses back from your web server when the operation completes. Click the “Save” button to save the setup.
3. Edit wp-config.php
By default, WordPress has wp-cron enabled. You’ll want to now disable wp-cron so that it no longer attempts to run all the cronjobs. If you don’t, then it will run in competition with Cron-Job.org and create even more traffic. You don’t want that!
Open wp-config.php on your web server and, just before the line that says “That’s all, stop editing!” simply add the following line:
Save wp-config.php to the server. (On Pantheon.io hosting, you change this file on the Dev instance, commit it to the Git repository, then push it to Test and then to Live).
For good measure, and to ensure that the wp-config.php changes are loaded, visit your site’s home page.
4. Monitor WP-Cron Execution
For the first few times after you reschedule wp-cron, you’ll want to monitor how things are going. After a while, when things seem to be doing fine, you can stop monitoring. If something goes wrong, you’ll get the email about it from Cron-Job.org.
In Cron-Job.org, you just pull up the list of cron jobs and note the last execution time and next execution time. To see the history of execution, click the “History” button.

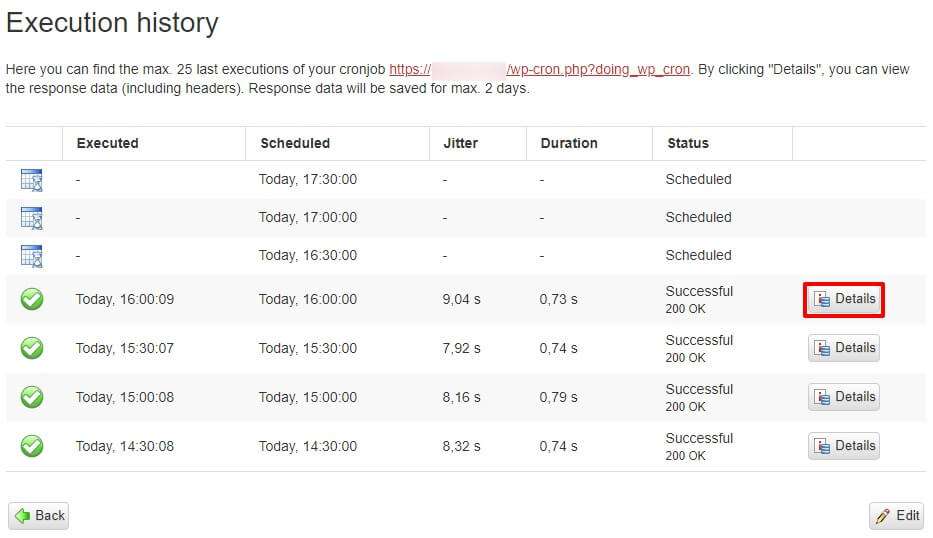
In the list that appears, you’ll see all the latest executions. As you can see, our job is running every 30 minutes and taking about 9 seconds from the very first byte to the very last.
Click the “Details” button to drill down more.

Now you can see the execution history (up to 25 of the latest). This view also shows you the “jitter” (a variable deviation from ideal timing event) and the duration of the execution.
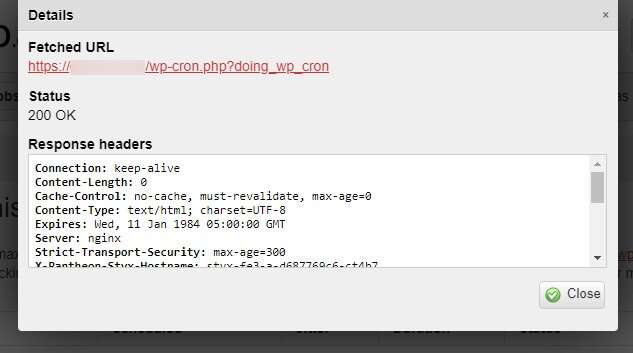
If it’s important to you to see how the web server responded to the cron job execution request sent to it by Cron-Job.org, click the “Details” button.
In the Details popup that appears, you’ll see the web server response headers, including content length, cache control, and whether Varnish served the request from cache.
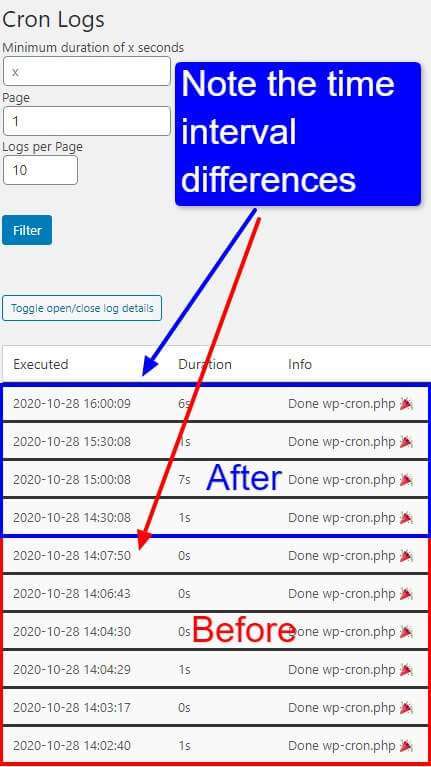
Heading back to the WordPress Dashboard and going to Tools > Cron Logs, we can now see the before vs. after effects of our scheduling. In the screenshot below, we see 1 minute intervals from before we did our reschedule wp-cron tasks. And now, above those, we see that they are executing in 30 minute intervals. Hooray!
On the hosting dashboard (in this case it’s Pantheon.io), we see something that might be a little alarming the first few times we see it. In the case of Pantheon, the “Status” tab is warning us that four of the 47 cron jobs are in a “PAST DUE” state. Prior to this reschedule wp-cron process, this area of the Status tab was almost always green. What happened?
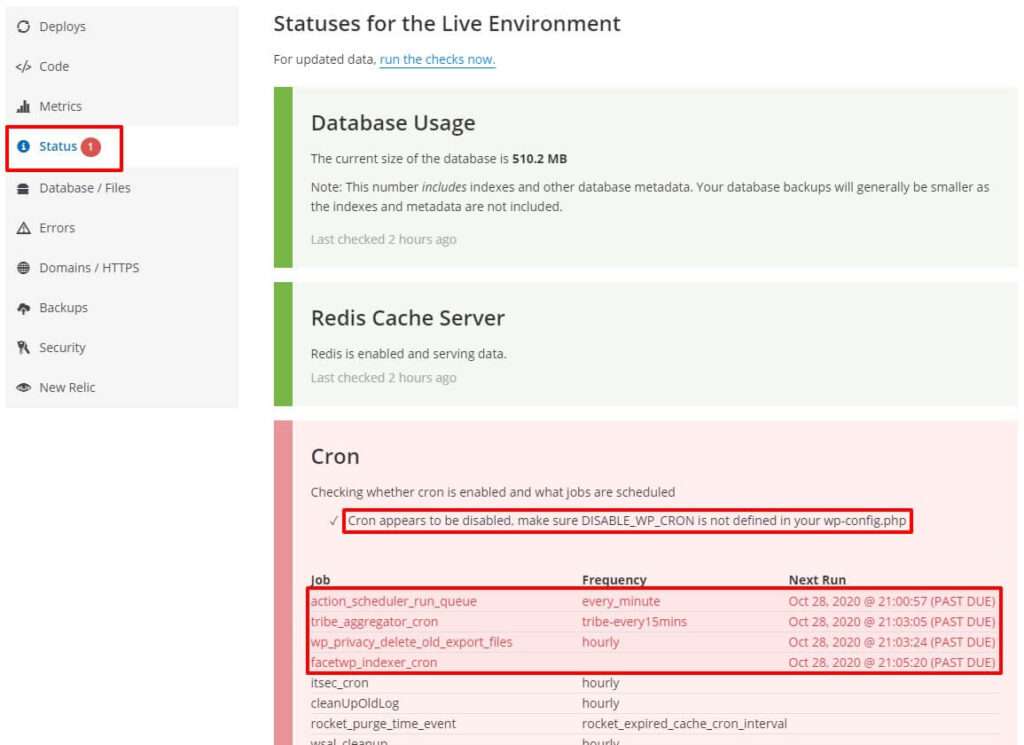
All this means is that since wp-cron.php is no longer in charge (because we disabled it in wp-config.php), Pantheon’s status checking algorithm, which expected these items to have executed by now, isn’t aware that we’ve offloaded that scheduling to Cron-Job.org. So, if you can live with it, this area will almost always be in a permanent “red alert” status. Just remember that Cron-Job.org is doing this for you and will alert you if something goes truly wrong.
Summary
In this exercise, we wanted to reschedule wp-cron so that it wouldn’t be as taxing on our web server resources. To do this, we installed a couple of plugins to make note of the general situation with our cron jobs. Then we opened a new account at Cron-Job.org and pointed it to our WordPress cron endpoint. We scheduled it for 30 minutes and set it to notify us via email if anything went wrong. Finally, we spent a little time monitoring the result to ensure that it’s doing what we want.
Let me know how this worked for you and whether it helped you save on hosting costs.
Do you wish you had a coach by your side to help you understand
how to run an online business?
Article header image Seobility – License: CC BY-SA 4.0
- Bio
- Latest Posts
Rob Watson
Latest posts by Rob Watson (see all)
- How to Reschedule WP-Cron Jobs and Slash Hosting Costs in 4 Easy Steps – October 28, 2020
- Straighten Your Priorities With the Time Management Matrix – October 27, 2020
- 3 Easy Steps to Find Your Online Business Niche – September 24, 2020
- WP Rocket 3.7 Features That Help Supercharge Your Website’s PageSpeed – September 9, 2020
- Users Avoid Clicking Ads. Here’s Why. – August 13, 2020

Leave a Reply